How to Use the GIT Option in Hostinger Hosting Platform
Using GIT for version control is essential for managing and tracking changes in your codebase efficiently. Hostinger, one of the popular web hosting platforms, offers an integrated GIT option that allows you to manage your repositories directly from their hosting environment. In this guide, we’ll walk you through the steps to set up and use the GIT option in Hostinger.
Table of Contents
- Introduction to GIT
- Why Use GIT on Hostinger
- Prerequisites
- Setting Up GIT on Hostinger
- Creating and Managing Repositories
- Deploying Code from a Repository
- Tips and Best Practices
- Conclusion
1. Introduction to GIT
GIT is a distributed version control system that helps developers collaborate on projects, track changes, and manage multiple versions of their code. It’s widely used in both small and large projects to ensure code integrity and streamline the development workflow.
2. Why Use GIT on Hostinger
Using GIT on Hostinger offers several benefits:
- Seamless Integration: Direct integration with your hosting environment.
- Ease of Use: Simplifies the deployment process.
- Collaboration: Facilitates teamwork by allowing multiple developers to work on the same project.
- Version Control: Keeps track of changes and maintains a history of your codebase.
3. Prerequisites
Before you start using GIT on Hostinger, ensure you have:
- A Hostinger hosting account.
- Basic knowledge of GIT commands.
- SSH access to your Hostinger account.
4. Set up GIT on your Hostinger hosting account:
1. Log in to Your Hostinger Account: Access your Hostinger control panel.
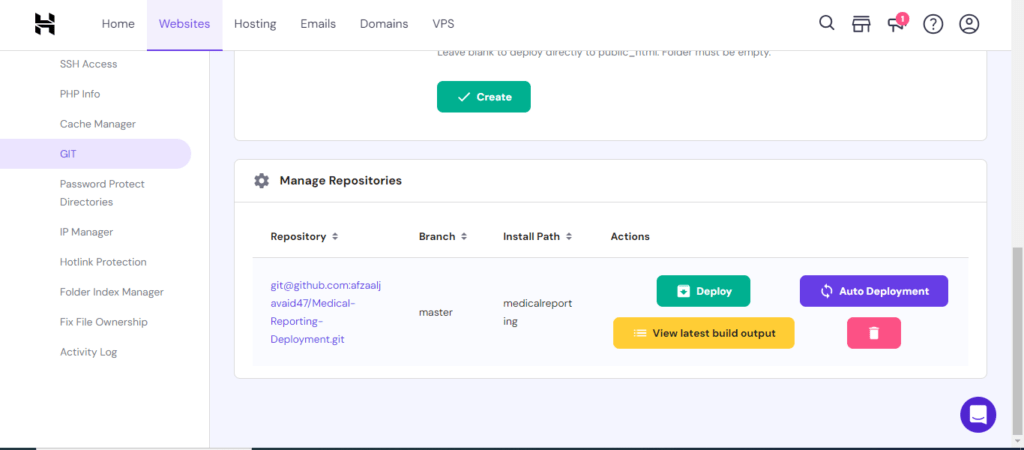
2. Access the GIT Option: In the control panel, navigate to the “Advanced” section and click on “GIT”.
3. Create a GIT Repository:
- Click on “Create Repository”.
- Enter the name of your repository.
- Choose the directory where you want the repository to be created.
4. Initialize the Repository: Once created, the repository will be initialized automatically by Hostinger.
5. Creating and Managing Repositories
- Cloning a Repository
- To clone a repository to your local machine, follow these steps:
1. Get the Repository URL: In the Hostinger control panel, go to your GIT repository and copy the repository URL.
2. Clone the Repository:
Open your terminal or command prompt.
Run the command:
“`bash
git clone <repository-url>
“`
– Replace `<repository-url>` with the URL you copied.
Pushing Changes
After making changes to your local repository, you need to push them to the Hostinger repository:
1. **Add Changes**:
“`bash
git add .
“`
2. **Commit Changes**:
“`bash
git commit -m “Your commit message”
“`
3. **Push Changes**:
“`bash
git push origin main
“`
Replace `main` with your branch name if it’s different.
6. Deploying Code from a Repository
Hostinger allows you to deploy code directly from your GIT repository:
1. Set Up Automatic Deployment:
- In the GIT section of your Hostinger control panel, enable the “Automatic Deployment” option.
- Specify the branch you want to deploy from (usually `main` or `master`).
2. Manual Deployment:
– If you prefer to deploy manually, you can do so by navigating to the GIT repository in the control panel and clicking on “Deploy”.
7. Tips and Best Practices
- Branching: Use branches to manage different features or versions of your project.
- Regular Commits: Commit changes regularly to keep your repository updated.
- Backup: Regularly backup your repository to prevent data loss.
- Security: Keep your SSH keys secure and do not share them.
8. Conclusion
Using GIT with Hostinger can significantly streamline your development and deployment processes. With easy integration and robust features, you can manage your code effectively and collaborate with your team seamlessly. Follow this guide to set up and start using GIT on Hostinger, and take advantage of the powerful version control capabilities it offers.
By leveraging the GIT option in Hostinger, you’ll ensure that your development workflow is efficient, collaborative, and secure. Happy coding by Afzaal Javaid!

